Introduction to AS coursework

My name is Ela and my candidate number is 9426. The other members of my group are Amber Mota (candidate number 9114) and Godgift Emesi (candidate number 9044). We are group number 3.

To access my work, please click on the labels on the right, entitled 'AS Research and Planning', 'AS Construction', 'AS Evaluation' and 'AS Preliminary Task' and ignore the rest that is classwork.

My Film Opening Sequence (Group 3: Ela, Gift, Amber) (New Guy)


My Film Opening Sequence (Group 3: Ela, Gift, Amber) (New Guy)

Friday, 13 March 2015

Question 7: Looking back at your preliminary task, what do you feel you have learnt in the progression from it to the full product?

Our final opening sequence: (Group 3 - Ela, Gift, Amber)


Our preliminary task: (Ela, Serena)


PRELIMINARY TASK

The preliminary task required us to film an actor walking into the classroom and exchanging dialogue with another actor. We edited our shots afterwards, making sure that we had followed continuity principles. This was useful as it taught us about the importance of the 180-degree rule, 30-degree rule and shot/reverse shots in filming.

An example of shot/reverse shot during a conversation:

An effective example of a match-on-action shot as the actor enters the room:


However our plan for the prelim was only brief, as we did not allocate specific weekends to shoot our footage, and the scene was set in school. We also did not have a time limit to adhere to, which made editing much easier.

PRE-PRODUCTION

For the production of our opening sequence, however, we created a storyboard, shoot-board and animatic prior to filming which helped us to achieve a better outcome. Approaching the film brief, we knew more about how we would plan the shooting and editing of our sequence, as we had already done this for the prelim.

Our timeline of shots:

Our research into audience, setting and the conventions of the genre was much more detailed for our film, as our opening had to have a clear narrative. Whereas, the prelim was less detailed and did not have a specific genre. 

We also had to sign permission forms before our shooting days in order to take the camera equipment from school property.

We were able to be more creative in planning our actual sequence as the narrative of the shots and iconography were all our own ideas.

PRODUCTION

As we had to manage a large group of actors, each of us were designated roles in the filming process, to make the shoot more efficient. This was not necessary for the prelim as we only required 2 actors. I had to take into account master shots and how much to shoot in order to achieve a seamless narrative. 

As our corridor scene was on school property we had to notify other members of staff of our shooting times. 

The production of the prelim task impacted our production of the film as we had to consider taking shots from several different angles in case there were continuity errors. Additionally, there were several issues with actor continuity in our prelim (Serena picks up items on the table and is holding a different item in the next shot of her). We had not realised our mistake until after having completed the preliminary task. This affected the production of our film, as we were constantly making sure that the background actors were doing the same thing in each shot. 

Organising actors' movements:

Our actor continuity is incorrect in this gif (that I made from our preliminary task). Serena is performing a different action in the second shot (wider shot) as she is writing and no longer holding the stapler. This is confusing and interferes with the flow of the scene. 

We made sure none of our shots in the opening sequence had these errors.

Principal challenges to consider when filming the real opening:
1. Setting (convenience and appropriateness of the shooting location)
2. Character representations
3. Camera angles and framing
4. Costume and props
5. Continuity (of shots and actor movements)

These shots matched the 30-degree rule:
This over-the-shoulder shot shows the audience Arthur's map of the school, connoting that it is his first day:

We also produced master shots, although these were used more in our prelim than our actual opening sequence:

During the production of morning routine scene, we had to consider space in the shooting location, as filming in a confined room affected the camera angles. I made sure that obstructions in the room had been moved to maximise space for our camera equipment. 

I made a floor plan of Arthur's bedroom to show where the camera would be placed (and the direction it would be facing) as well as Arthur's movements:

The test shoot had previously taught us the importance of several takes of the same shot in case we were to notice any mistakes after uploading the footage. 

POST-PRODUCTION

The post-production process required for each task was as follows:

Editing the film was much more time-consuming and difficult than editing the prelim, which was only a 46 second sequence. We spent most of our editing sessions grading (using ProcAmp and the three-way colour corrector), designing and adding titles, recording voiceovers, and adding soundtrack and transitions. This was not necessary for the prelim as the editing process only demonstrated continuity (cutting down the shots).


Our feedback video assisted us in altering a few errors in acting (for example, the phone showing 11 o'clock and the jump cut at the start of the corridor scene). For our prelim, we were only able to receive feedback from our teachers, whereas our surveys were aimed at the target audience (aged 15-24) so that their suggestions would allow us to adapt the film to a teenage audience. 

Post-production developed our teamwork skills in both the prelim and the actual opening. We managed to share the workload evenly between us and make sure each member of the group agreed with the decisions made (for example, in deciding how much to grade or which soundtrack was more effective)

EVALUATION

When evaluating our finished work, we required several examples of audience feedback to support our conclusions, although this was not necessarily for the prelim as it was a basic scene with no complex narrative. 

Conclusion
I am pleased with the final outcome, excepting a few errors, (the jump cut in the corridor scene and the wrong time on the Arthur's alarm). I think we worked well during the audition and casting process as our actors suited their characters, making the film more realistic. Given more time, I would focus more on making sure that continuity between shots is accurate. I would also re-record the voiceovers to make the mother's voice appear as diegetic sound, rather than non-diegetic. 

My knowledge of filming and editing processes and equipment has developed, and I am much more confident in incorporating film theories (such as match-on-action, binary opposites and Todorov's theory of equilibrium). This project has demonstrated the time and effort needed to produce opening sequences, the importance of pre-production stages, and how to match shots in order to follow continuity principles. 

Thursday, 12 March 2015

Construction Post 10: Looking back - reflections on our final outcome

After having completed the production and post-production stages, I am pleased with how our project has progressed significantly throughout. We managed to successfully solve any lighting issues (by filming earlier in the day in a particular corridor) and connote the genre and narrative of the film through dialogue, music, iconography and setting. The development of the project has been the most time-consuming during editing as we had to be aware of continuity principles and make sure our representations of character were evident. The editing process also involved a lot of group discussions to confirm that each of us approved the changes we made to the edit.

We hope our audience will recognise and appreciate the niche social groups that the film aims to represent, and reflect on their own experience in high school. Hopefully, the audience will infer the genre of the film from the opening sequence and be drawn to watch as the narrative of Arthur's experience in a new school unfolds.

Although, difficult aspects of production were managing a large group of actors while setting up camera equipment and adapting our skills all aspects of editing (so we would each have an equal input into the project). I am pleased with how we worked as a team in making decisions and agreeing on ideas for the benefit of the project as a whole. In hindsight I would have planned more time for us to experiment with shots and camerawork, as this would have allowed us to produce better framing for the shots. We could have also paid more attention to actor continuity between shots, however this was difficult due to the large cast and a lot of movement in the background. If it had been possible, we would have shot the corridor scene early at the weekend to take advantage of the lighting, but the location was unavailable at that time. We got on well as a group and made compromises to make the final outcome better overall.

We decided to change the name of our film to "New Guy" during Edit Week 2.

Construction Post 9: My technical learning curve (production and post-production)

Each of us contributed to every aspect of production and post-production. For the test shoots and main shoots, I was mostly responsible for camera work and organising set design, props and costume. In order to complete our edit efficiently and to the best of our abilities, we worked both individually and as a group to come up with more creative ideas.

Setting up camera equipment after having designed the set:

After the Prelim, I knew how to use Premiere Pro in order to cut down shots and show continuity. However, the project has largely improved my skills in grading and adding other effects (audio, music, voiceover). I learnt much more from editing in particular, as we had a very limited time to complete our final edit, therefore we had to work quickly and adapt our ideas throughout. Watching YouTube tutorials on how to edit the footage made it much easier to use Premiere Pro despite having little confidence at the beginning of Edit Week 1. I learnt how to record and add soundtrack to the sequence during Edit Week 2, which I had no prior experience of from the Prelim. However, I would have liked to have been more involved in sorting out audio effects more.

Colour correcting and grading tutorial:

To alter colour tints, drag the mouse from the centre of the wheel away from the unwanted colour of the shot:

Gift and I creating titles to add to our sequence

Recording voiceovers for the opening shot

Furthermore, the filming process taught me a lot about managing a shoot involving several actors and working together as a team to show leadership. It has been useful to recognise the importance of planning shoots well in advance, and sticking to a shoot/edit schedule and group meetings in order to complete work in time. Some of the shots we had planned were much more difficult to film in practice, therefore prior test shoots and rehearsals were crucial.

Wednesday, 11 March 2015

Construction Post 8: My personal contribution to the Edit Sessions

In terms of editing, I enjoyed working individually and as a team in choosing the best footage, cutting the shots down, and adding sound effects and titles.

During Edit Week 2, I chose the font for our titles which connote the genre well in my opinion. I made a list of several options for fonts that were appropriate, which we narrowed down once we had discussed as a group which font was the most suitable for our target audience.

I also graded some shots including the corridor tracking shot (by lowering the brightness, and increasing the contrast and saturation) to make the shots more compelling and eye-catching. As a group we completed grading the first scenes and checking that the colour tints were similar throughout. I also organised the shots into folders to make it quicker and easier to locate the best footage. Amber and I created the logo for our production company (EGA) using Photoshop.

EGA Production Company logo

Gift and I choosing fonts for our titles


 Creating the titles (including changing the style/effects/timing of titles)

I enjoyed learning to grade individual shots and cutting down footage to produce a finished sequence. The post-production stage has significantly improved my editing skills, however I would have liked to have done more in editing the voiceovers and sound effects. I am much more confident in getting on with the project as I have learnt many more technical skills in Premiere Pro (such as using the three-way colour corrector and producing the split-screen effect). Although, some areas to improve would be checking shots to make sure of continuity issues and cutting down the shots to better timings.

Before/after examples of grading:


We had to make sure we changed the colour of each shot equally so that they matched throughout the sequence.

Tuesday, 10 March 2015

Construction Post 7: My personal contributions to the Shoot Sessions

For the school corridor shoot, I was in charge of managing the large group of actors and making sure they were in costume in time for filming. I was also acting in the corridor tracking shot, and organised the order of shots with the shoot-board. To make sure that our iconography and representations were clear, I set up the props in the classroom prior to the shoot.

Reflections: our group worked well as a team, as we were each delegated different responsibilities according to if we were acting in it or not, so that filming would be more efficient. Amber, Gift and I were able to view the footage after each take to make sure we all approved of the shot. We were able to discuss our thoughts on each take and agree on whether the framing or camera movements were effective. (The camera was too close-up in some of the earlier shots). Working as a team was difficult at times as both Gift and I were acting in the sequence, but the process was much easier when we each had to be responsible for different aspects of filming. Each of us had an equal input on aspects of the shooting that we wanted to change, and we communicated well throughout the shoot session. However, we had to remind our actors to be conscious of other events in school at the same time, and appreciate their patience during the shoot.

For the shoot inside the house, I was responsible for setting up the filming location to include representations of our genre, and I also filmed some of the final shots (Arthur getting out of bed, picking up keys, walking through hallway).

Amber and I directing the first scene:

Reflections: This shoot was much more time-consuming because we had to film several shots, but we were more prepared as we only had one actor to manage. Each of us took turns at filming and reviewed the takes to find any errors in framing/lighting/continuity. I noticed that some of the shots for the split-screen were too close-up, which we corrected in the next shots. As none of our group were acting for this shoot, we were able to assess whether the shots were match on action or not, while they were being filmed. This made filming much quicker, as we did not need to repeat takes several times. As a group, we supported each other in delegating responsibilities and making decisions that would give us better footage.

Our group setting up camera equipment

Behind the scenes footage of setting up equipment and dressing the set (I included clothes, a backpack and a basketball to the set design to show representations of character)

Monday, 9 March 2015

Construction Post 6: Reflections on Edit Week 2

Schedule for Edit Week 2:

EGA - group meeting
E - Ela
G - Gift
A - Amber

Our second week of editing has been more useful in developing our project as we have added titles, and made sure that the soundtrack and sound effects are at the correct timings. We also created a voiceover of one of our actors as the role of Arthur's mother (in opening shot). Using the microphone and headphones, we recorded this dialogue from behind a closed door to give the effect of his mother shouting to him from downstairs. This is much more successful than the voiceover that we recorded for the rough cut, as it is much more realistic and appears to come from further away.

After completing the cut, we altered the music and sound effects so that they would match the action in each shot. We also included transitions to make the sequence more effective and realistic.

As we had completed our cut, the next stage was grading, in which we altered the brightness, contrast and saturation of the footage to give the intended effect of the genre. Below shows the grading process, including the three-way colour corrector which allowed us to fix any issues with colour (for example, we removed yellow and blue tints from the corridor shots, and we made the shots in the house more saturated). This tutorial assisted us in navigating the colour corrector on Premiere Pro and how to use it. The lower image below demonstrates how we were able to shift the colour away from other colour tints which were not effective for the particular shot.


For titles, we chose the font 'Brain Flower' as it matched our style of film and was effective in connoting the teen comedy genre. (It is similar to the informal font used in "Juno")


Reflections: Overall this week was more productive than last week, as we knew the changes we planned to make once we had completed cutting the shots. The grading process was the most challenging because our shots varied in terms of the lighting and contrast, however our project has developed significantly as the changes we made to the grading clearly connote the teen film genre. We managed to find extra time before and after school in order to complete the editing process which was useful in evaluating our decisions about titles and grading. However, to improve our final outcome we could have added the voiceovers before Edit Week 2, which would have saved time for other priorities such as grading.

Amber, Gift and I grading the final scenes

Sunday, 8 March 2015

Construction Post 5: The Back-Up Shoot

As most of the shots from our main shoot in the house have errors/could be improved, we will have a back-up shoot the following weekend.

Re-takes:
  • First shot waking up in the morning: Arthur should appear more tired, rubs eyes before getting out of bed
  • Picking up clothes from the floor: it should be clearer that he is trying to find his clean clothes, and the camera angle should be higher up
  • Brushing teeth: mid-shot rather than a close-up (to fit in the split screen) 
  • Addition of extra shot of Arthur putting on jacket (for right hand side of split screen)
  • Walking along hallway to front door: Arthur should shout "bye Mum" before opening door, then exit house
Even though these are minor mistakes, it is worth re-shooting the first half of the sequence as these errors could impact the project as a whole and make the sequence less representative of a teen comedy film.

Reflections: Prior to the back-up shoot we noted down the changes we planned to make, which meant that we spent significantly less time re-filming the shots. The new footage is much more effective and the sequence appears more professional and well-thought. We were more organised for shooting, and the issues with framing have been reduced as much as possible. Our shots in the school corridor were acceptable, and no back-up shoot was needed due to the difficulty using the set between 4 and 6pm and unavailability of actors. Overall the back-up shoot gave us significantly improved shots in terms of actor continuity and framing.

1. 

2. 

We replaced our take from the main shoot (1) with the shot 2, as Arthur's dialogue is more effective before opening the door. We also panned the camera further left so that the hallway would be in the centre of the shot. 

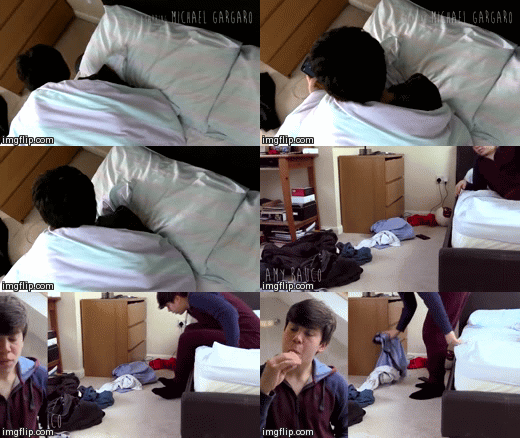
Arthur now appears more tired when waking up:

The split screen shots are now more suitably framed (mid-shots) as they did not show much background and were too close-up in the first shoot: